Thursday, December 20, 2012

Nail Art on Toes: Butterflies and Flowers

I actually have nail art on all my nails at the same time *gasp*! Are y'all as shocked as me? I've been really interested in nail art and getting better lately. So if you hate feet or are disgusted by them turn back now!

This is my first time using LEX Cosmetics polish even though I got them a LONG time ago for free from sneakpeeq. Note that this is in no way a review of the polish, I will only mention the generals that are important to every nail polisher :)


I used 2 coats of LEX Cosmetics polish in Lil Mama (again free from sneakpeeq not for a review!); pink, blue and purple acrylic paint that I mixed with white acrylic paint all by Apple Barrel (.57 cents each!); Tulip glitter I got from Hobby Lobby on clearance (see here) and the flowers are Kiss nail decals (see embellishment post here).

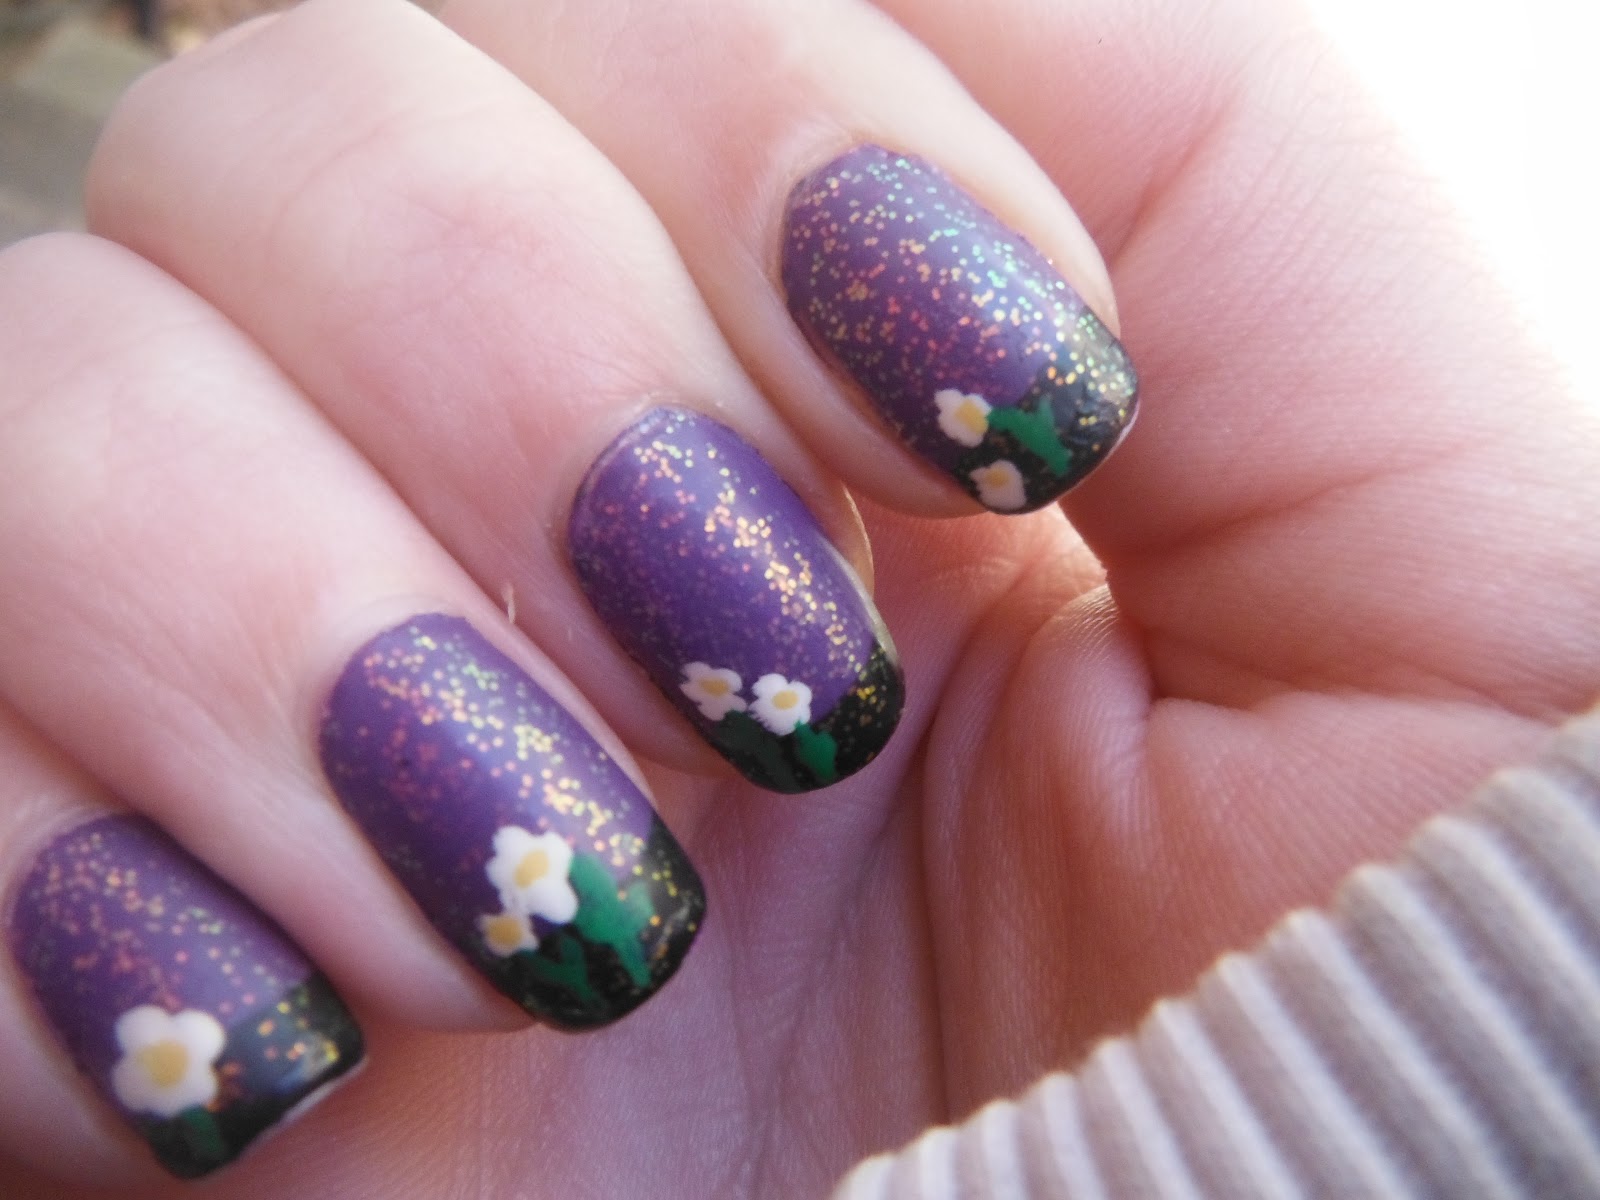
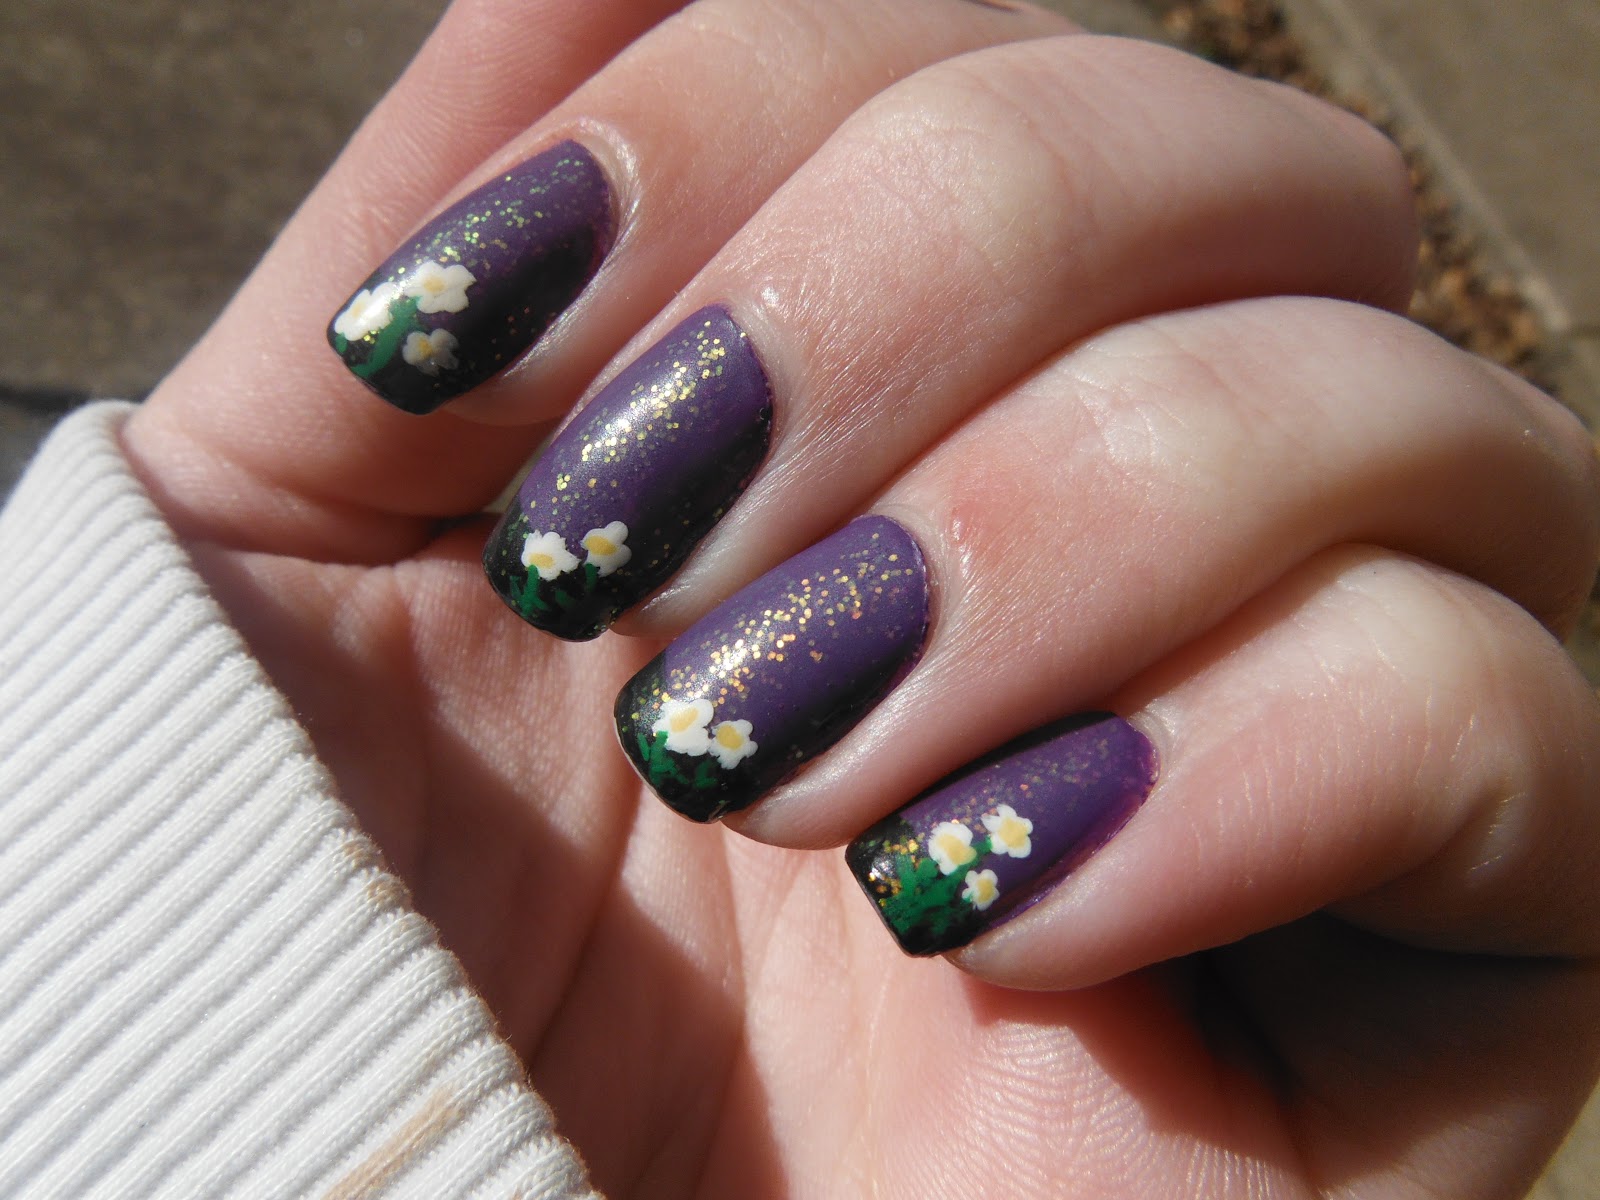
All I did was paint random little butterflies all over in different colors. They aren't perfect but I still think they are cute! I put a little top coat over a couple of the butterflies and brushed corresponding colored glitter over them which definitely added something but made them lose their definition lol. So I ended up just going over all the nails with Jordana Crystal Glitter. I freakin love that stuff! Just found out where to get it again and I was ecstatic! The answer is KMart if you don't know. I've had the same bottle for years and it's kinda yellowed and really goopy even with tons of polish thinner so you can understand why I love my new bottle so much. 

Lil Mama is a great formula though pretty expensive generally. It applied nicely and was a little shear with just one coat. In the bottle it's kind of got a silver metallic sheen but not on the nail. 

So what do you think? Do you do nail art on your toes? Let me know in the comments below!
As always, thanks for stopping by :)

Wednesday, December 19, 2012

Rainbow Cheetah!

Otherwise known as no festive manis over here lol.

I've wanted to do this for a while and I actually tried rainbow on my toes last week but I hated the way they came out. This is inspired by Colette from My Simple Little Pleasures
I used a Q-Tip to do the sponging, I find it's usually easier and neater. I used Ulta Sweetheart Pink, Sally Hansen Inst-Dri Lightning and Fingerpaints Inkblot Blue. I started by putting pink on the top of my nail at the cuticle as well as at the tip. Then going to yellow work halfway down the pink so that it (is supposed to make) makes orange. Go far enough down with the yellow so that you have a strip of yellow plus another length of it. Now add the blue. Start by going over the yellow to make green. Keep going all the way down the nail so you get purple at the bottom. 
The yellow I used is far too opaque to really show orange well unfortunately. I'm pretty happy with the rest of the colors though :) The pink could have been brighter but that's ok. Neon colors work best with this mani. I did start off with 2 coats of LA Colors White so that the colors would pop more. 
I added random little different facing c's, spots and dots using my Metallic Black acrylic paint by Folk Art. It isn't really different at all from the regular black though so I'd say save your money lol. 


The spots on my right hand are a little more messy, I'm still pretty shaky but I still like it :) I do wish the colors showed up more vibrant in the pics. 
What do you think? Will you be trying this one?
As always, thanks for stopping by :)


Tuesday, December 18, 2012

Penis? 18+ only please!

Are you at least 18 years of age? Can you take a joke? If the answer is yes keep reading. If the answer is no then please go back to wherever you just came from.


Ok then for all of you still with me, I have some crazy nails! You may know I've been working on painting more and you also may know what this is already if you follow me on Facebook, Instagram or Twitter. 

Penis Nails! Yes, of course, I had to lol. As one of my friends said, "no bees or butterflies for you when you decide to practice more realism!" 

I should probably note that this is really only half a mani, I was in training that week and I didn't have time to do art on my right hand. Though it was gonna totally be almost as epic as the left.

Pics?

I'm not gonna explain what is what, if you can't figure it out you just aren't pervy enough lol. 
Two coats of WnW Black Creme and the rest is acrylic paints that I mixed to make the perfect colors. 
So what do you think? Would you ever do something really naughty like this?
As always, thanks for stopping by :)

Mini Haul from Hobby Lobby

**Note** This post is a couple of weeks old now because of running out of pic storage room here. But I fixed it for now :D

I haven't been into a Hobby Lobby until recently  when I got some glitter and water soluble ink but I've been trying to find a decent striping brush so I went back in today. I can never leave with just one thing though lol.
What I got: 


A bag of feathers; Folk Art acrylic paint in metallic gold, silver and black; Apple Barrel acrylic paint in a skin tone color; Tulip glitter caddies that were on clearance; black glitter and another art brush. The Love My Nails polish is Frosted Purple and I got it from my friend Stephie. She was showing me her polish and I begged her for it lol. I have one but it's almost empty :( Yay for backups! 
The gold paint in the back on the right side is tempera paint. It's pearlescent and looked really cool and it was on clearance so I got it lol. 
Do you guys like Hobby Lobby? Any idea where to get a decent striping brush?
As always, thanks for stopping by :)


Monday, December 17, 2012

Hey guys

Please come see me on the Facebook page! I ran out of storage room on here and while I'm working on it I've been putting everything on Facebook! I have some nails you really don't want to miss lol.  

Thursday, December 6, 2012

Funky French with Flowers

I have to admit I'm a little behind on this post. I did these Thanksgiving week and wore them till a couple days ago. I usually do my nails by Wednesday night since most of my art stuff and a little bit of my polish lives at work. I swear that was my intention but I got to watching Robin Moses videos at work all week and I just never ended up doin it lol. Anywho nails! 


One coat of Sinful Colors Amethyst; black, green, white and yellow acrylic paint (all Apple Barrel) and topped with Kleancolor Chunky Holo Purple and NYC Matte Me Crazy. My original intention was to just do the purple and black but then it needed something so I added the little flowers. Which made me realize I want to try more advanced art and get better which started the Robin watching lol. Stick around for the next post I promise it's going to be crazy!!! 
So what do you think of the nails? I liked them! And they wore really well considering the tips were acrylic paint lol. 
As always, thanks for stopping by :)

Tuesday, November 20, 2012

Waterless Water Marble


Hi guys! As you may know I’ve been doin quite a bit with acrylic paints lately. You may remember the zombie nails I did for Halloween where I mixed the paint for the background.  I’ve mixed paints for a couple of other things as well such as the pink ribbons for my Breast Cancer Awareness mani. Well when I was mixing the paints I happened to notice that it actually takes a good bit of mixing before the colors really come together which brings me to this mani. I also noticed how it kind of looked like marbling. 


How many have trouble with water marble manis? I mean, really, its pretty tricky to get the hang of. And then you add in all the little annoyances such as tape or bubbles, trying to get the design right and not being able to get it or the polish drying too quick. Seriously, unless you’re Colette from My Simple Little Pleasures (who actually really inspired me in the nail art ways) water marble can be super hard and super frustrating! I am, if nothing else, lazy and a huge fan of the easy way lol. 

So here we go!
What you’ll need:
Acrylic Paints in whatever colors your heart desires

Something non-porous to put the paint (I’d recommend either paper or something flat and plastic)

A paint brush if you’d like (doesn’t matter what size, shape or type)

How to do it:

Step one: Pick the colors you like. For this I used  Too Blue, Purple Iris, New Shamrock and Magenta Brilliant. All by Apple Barrel, all 57 cents at my local WalMart store. What cheaper and easier? Yeah I’m down for that lol.
Step two: Drop dollops of color onto your paper or plastic or whatever the heck you are using. I did purple on the bottom and randomly dropped the other three on top. Swirl around til you are happy with how it looks. Don’t swirl too much! 

Step three: Just like water marbling, you will dip your finger nail down into the paint. Don’t worry about taping, or trying vaseline or anything else. It’s easy to clean off. If you don’t like it just dip again! That easy, really. You can also add paint to the nail with the brush though its more of a muted effect (see middle finger). 


Step four: Let it dry. Now this isn’t polish. It doesn’t take forever and a half to dry. The paint does dry matte but you can change that if you would like.

Step five: Topcoat the hell out of it. Seriously. Wrap your tips like crazy and make sure all the paint is covered by topcoat as acrylic paint will come off with water. 

Step six: Clean up! I left the paint on in most of these pics just so you see how messy it is. Don’t avoid it, enjoy it. Let it remind you of fingerpainting as a kid lol. Really once your top coat is dry just go wash your hands with soap and water makin sure to rub the paint. It comes right off (it took me about 2 minutes max to get all the paint off that I didn’t top coat over).


Do you remember back to my Try It On Tuesday water marble? That took hours and I still wasn’t happy with it. This took less than 10 minutes to do. It’s cheaper, acrylic paint goes a long way. It’s easier than tryin to hurry, hurry, hurry before the polish dries.Oh yeah, it’s a lot more fun! 

A few things to note:
Miss a spot when dipping but don’t want to dip again? Use the brush and just add a tiny little bit. Blend or not it’s up to you. 
You can also use the brush to put the paint directly on your nails, you just don’t get all the swirly effects vibrantly.
Acrylic paint is less durable on your nails than polish, topcoat is very important! I type all day and I do have a little tip wear and a few chips from where I didn’t wrap my tips as well as I should have.
Its not all super thick like polish is and it all lays flat. A huge plus for me!

So what do you guys think? Will you try it? 

Here are all the pics:
Left thumb my favorite nail


Left ring finger my third favorite nail


Middle right, my second favorite nail


They are a lot more vibrant in real life, for some reason my camera doesn't like this mani lol. Let me know what you think in the comments! 
As always, thanks for stopping by :)

Sunday, November 11, 2012

Sinful Colors "Love Nails" *Super pic heavy!!!*

Do you ever have the perfect color and it just refuses to photograph well? Like it's so gorgeous that you absolutely can't stop staring at it and you dread when it comes time to take it off? Yeah, that's what's goin on here. 

I seriously tried super hard to get some decent pics for you guys. If you hang around the facebook page then you've already heard this lol. I finally managed to get some decent pics though. 

I still don't think I managed to completely get fantastic color accurate pics of this color but you definitely can't say I didn't try!
Inside under florescent light:

Outside in natural light no real sun:


Outside with flash:
Inside with direct light:


In the car with just the car light, it really shows more of the colors and just looks really cool lol. You can really see the green/gold/blue here:


More:


Honestly none of these are completely color accurate. No matter what I do, I just can't get it :( If you don't have this polish I'll do my best to describe it.....It's metallic blue that is incredibly vibrant, it has flashes of other colors but I wouldn't call it a duo chrome. All these pics are 3 coats each. It's pretty shear but I don't think it would look better with undies. The formula is really great to work with, not too thin and not thick at all. Dry time is not terrible. I think I'll be keeping this on for quite a while if I can. It's not boring me at all though I might add something to it.
Sorry for the super long post! I really tried to get great pics :( I think I'll do my toes again this week though.
As always, thanks for stopping by :)